In geology, field sketches are a primary means of data collection. To gather these data accurately and impartially, Emma Jude argues that all geologists could learn from the techniques of fine artists
A good field sketch is a joy to behold; methodical, thorough, and instantly understandable to any geologist. Its primary aim is objectivity, detaching the expert eye from pure observation in order to observe unexpected relationships and form new ideas.
It was only when I began to practice observational drawing in the classical style during fine arts education that I realised how much my undergraduate teaching in field geology had prepared me for it (Fig. 1).
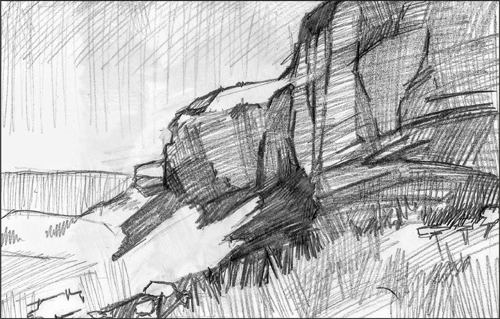
Fig 1, The author’s own sketch from the field, at Kettle Ness, Whitby.
Nowhere are we all more expert than in taking the information provided to us constantly by our eyes—lines, curves, shapes and tones—and converting it to meaning. In seeing the world, every minute of our lives we are a poor field geologist, taking a few vaguely familiar lines and converting them instantly into a table, an orange, a glass.
This is most apparent, and worst directed, in the recognition of faces. Our brains are so primed to recognise faces that we constantly misdiagnose them; in the headlights and bumper of a car, the famous ‘face on Mars’ or a holy figure on a slice of toast.
As geologists, this psychological phenomenon that causes people to see patterns in random stimuli, pareidolia, risks us being model-driven, unable to clearly distinguish between pure observations of field outcrops and our interpretations of the processes that created them. Pareidolia is similarly the main driver behind undercooked observational drawing among non-artists.
Observational drawing
To demonstrate, try to conceive drawing an eye (or if you have a pen to hand, draw one!). The most common response is to draw a ‘symbol’ based on our expert brain’s assumptions: a lemon shape, a circle in the middle for an iris, eyelashes pointing outwards—and probably drawn without actually looking at an eye. The result is usually flat and more than a little unsettling. Compare the typically symbolic drawing of an eye (Fig. 2a) to those drawn using fine art techniques (Fig. 2b-d). The lemon shape, while present, is not the main feature, and eyes are often much more complicated than we think.
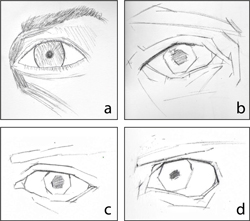 Fig 2, A symbolic drawing of an eye by a non-artist (a), and a comparison using observational techniques from this article (b-d).
This is the core principle of observational drawing; look, then look again. It is only through detailed and accurate observation that we can switch off our ‘inner expert’ and create accurate representations of space. Fortunately, over the centuries of art practice, shortcuts have been developed to help this process—though these are rarely taught to non-artists.
It is my firm belief that a solid foundation in drawing should be taught as a matter of course in undergraduate fieldwork, and more importantly reinforced through sketchbook marking and coaching. Conversely, the skills that an experienced field geologist gains through years of switching off the ‘inner expert’ can be elegantly transferred to drawing for pleasure with some application of basic theory.
Key skills
One might divide drawing skill into three main aspects. Cognitive skill is the ability that is practiced by all experienced geologists, that which allows us to make pure observations without bias. Practical skill might be defined as putting the observational data onto the paper in the place where you want it, and this is where the tricks and exercises of classical drawing can be employed to improve sketch quality and speed. Finally, you might define the ability to make a smooth and decisive line as physical skill (not always as easy as it looks!). Everything else—style, spirit, a sense of place—follows from grounding in these core principles.
For those who want to further develop their practical or physical skills, any foundational textbook of observational drawing will contain exercises, but the classic of the genre is ‘Drawing on the Right Side of the Brain’, by Betty Edwards, where the subject is approached from a methodical and scientific angle. It also benefits from believable before-and-after drawings from students of the author, showing how applying these cognitive skills can radically improve drawing in a very brief period.
Simple exercises
There are several simple exercises that can improve your sketches and test these theories, which might include:
Drawing upside down: Here you take a complex image (such as a face, figure or landscape) that you would like to copy, turn it upside down and make the copy that way. You will find that without expert shortcuts available to you, the copy will be far better than you expect. This combines cognitive and practical skills to get the shapes you observe down onto the paper in the right order.
Drawing negative space: Try drawing negative space by taking a small arrangement of objects and drawing out the shape of the spaces between them, as shown in Fig 3. These shapes do not have a pre-programmed assumption associated with them, and as such it becomes far easier to correctly perceive spatial relationships. This is a reinforcement of pure cognitive skill.
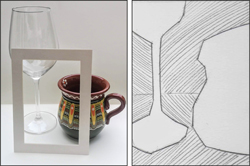 Fig 3, A simple still life showing negative space. The shaded area in the right-hand-side image can be observed without interpretational biases, and placed more accurately, than drawing the objects themselves.
Squinting or half closing the eyes is a remarkably successful practical technique to reduce a mass of complexity into simple shapes, which can then be treated as in the negative space exercise. Try this experiment with a strongly-lit still life or sunny outcrop.
Developing a smooth line: Physical skill is mostly muscle memory, but a shortcut to making smooth lines is to restrict them to single curves and make the movement from the elbow or wrist rather than the hand.
To experiment with this, take a large sheet of paper and hold the pencil as normal. First, try to draw a smooth curve in your normal style, likely by moving the fingers and the hand. Repeat the exercise but keep the hand fixed, swinging the arm from the elbow to make large, sweeping curves. Then try it with the elbow fixed and pivot from the wrist. Complex curves can be produced by amalgamating these simple curves.
Field application
These techniques can be applied in the field to improve landscape drawing, whether this is as part of field sketching or in the development of drawing for pleasure. While the exercises above can be done with a landscape rather than a still life or a photograph subject, some of the exercises I might teach in the field have an emphasis on application. For example:
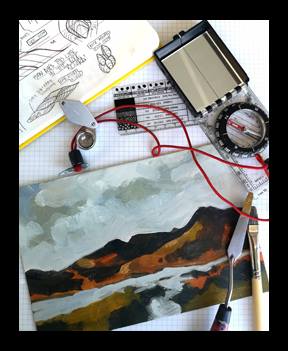
Working with a viewfinder: A common piece of artists’ kit, typically a rectangular frame made from card (Fig. 4), a viewfinder helps you to accurately map spatial and angular relationships. After first drawing around the viewfinder on your page, you then hold the viewfinder up to the outcrop to accurately represent proportions on the page.
An effective way to combine this with the ‘negative space’ exercise might be to use it to establish an accurate cliff line in a complex outcrop sketch. In this example (Fig. 5), the shape of sky bounded by the cliff and the viewfinder is easier to draw than the cliff itself.

Fig 4, The author’s viewfinder, taken from the inside of an inexpensive photo frame.
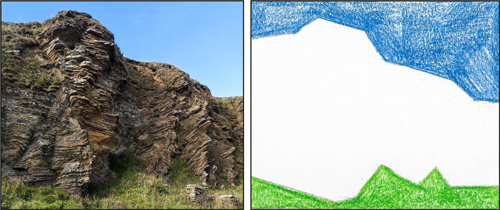 Fig 5, A complex folded lacustrine sequence at St John’s Point, Caithness as would be seen through a viewfinder (left), and the ‘negative space’ exercise applied (right). The major fold structures can be more accurately represented once the large shapes are mapped in.
Refining a drawing: It is easy to get bogged down in an interesting area and distort the spatial and angular relationships of a whole outcrop. Before looking at any details, start with ten straight or single-curve lines to define the shape of the outcrop. Change coloured pencil and refine the accuracy with another ten lines, then repeat. You will find it easier to space out and size the features this way, and it results in a faster field sketch with fewer revisions (Fig. 6)
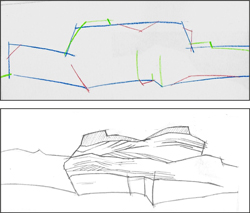 Fig 6, Progress of a refined field sketch. Starting with the broadest shapes and refining them (above) allows for the major geological observations to be mapped on (below) without losing spatial relationships.
For Earth scientists, field sketching is one of the most fundamental and valuable skills. While drafting this article, I was genuinely surprised by the number of my colleagues who expressed frustration or nerves around the topic. A simple reference sheet or an enjoyable evening class in the field may improve the experience, not only leading to better and more efficient fieldwork but also allowing more people to access and enjoy art in their own way.
Emma Jude is a petroleum geologist and a locally exhibiting and practicing fine artist. She recently completed foundational studies accredited by University of the Arts London.
She is developing a one-day field course in the South East teaching ‘Observational Drawing for Field Geology’—for more details or to express interest contact [email protected]. To view her work exploring links between landscape, the process of interpretation and human history view her work at instagram.com/emmatheresaartist.
Further reading:
Edwards, B. (1979) Drawing on the Right Side of the Brain. Penguin Putnam (revised and reprinted in 1989, 1999, and 2012), ISBN 0874774241.
The Official Website of Betty Edwards:
http://www.drawright.com